Next month a family member will be getting married. It is an out-of-state wedding that I am not able to attend but I really wanted to make the happy couple a little something. I thought it might be fun to walk you through my thought process of making a personalized design. I really learned a lot in articulating my process. Maybe you will find something in common with your own process or walk away with a new tip or trick. I would love to hear about your process and any tips you have in the comments below.
It is a tie on how to start between deciding what to make and information gathering but in this particular circumstance I had an idea of what I wanted to make first so that is the order I used.
DECIDE WHAT TO MAKE - Think of the occasion and it’s meaning. Ideas start to flow from there. Since the occasion is a wedding, I thought it would be nice to make something commemorating the special day. I want to make an embroidery design featuring the date of the wedding along with some other design elements. I’m thinking a round hoop wall hanging. This leads me to the next step in the process.
INFORMATION GATHERING - This does not necessarily have to come as a second step, as I mentioned above. Sometimes I gather information, then the idea about what to make springs from there. It is an essential beginning step to creating a design. How much do you know about the person or people you are creating the design for? Here are some things to think about:
***Do they have a favorite color palette ? (Perhaps they are beach lovers, you could use a ‘beach’ color palette | Nature Lovers might love a green palette, etc.)
***What are their hobbies/interests? Are they Sci-fi lovers, gaming nuts, fishing fanatics? Hobbies are a rich source of visual imagery that can be incorporated as design elements.
***Pet peeves, favorite sayings, quirks and eccentricities are all fabulous things to include, as they really are meaningful and personal to the recipient. We once had a tour guide on vacation who also happened to be terrified of butterflies; Of course his thank you card would definitely have a butterfly element - NO BRAINER!
***If you know the person/people well, that makes your job so much easier! Friends, family and co-workers can also be invaluable in resource gathering. If you are friends on Social media that can also be helpful in getting a better sense of the person and their likes/dislikes.
I was lucky to discover that the couple were having a Harry Potter themed wedding shower which gave me so much to work with! Not only does this give me design ideas but also provided a color palette to work with.
BRAINSTORMING - Once I have gathered some essential information and some subject matter to work with, I start gathering some visual imagery which sparks my imagination. I find Pinterest to be a wonderful resource. Google images is also a great way to get jumpstarted. Sometimes I will find when I am “attuned”, I start finding inspiration everywhere I look; typography on a piece of junk mail, magazine ads, and anything that crosses my path has potential for ideas when I am in the zone and on a roll.
Since I am a huge Harry Potter fan myself, this made my job even easier. I immediately was able to think of some elements that would be easily recognizable within my theme:
HARRY’S GLASSES
MAGIC WAND
GOLDEN SNITCH
GOLD AND MAROON SCARF
I also knew I would like to include:
THE INITIALS OF THE COUPLE
THE WEDDING DATE
A RELEVANT QUOTE
Sometimes it helps to make a list of the things you would like to include before getting started with the next step.
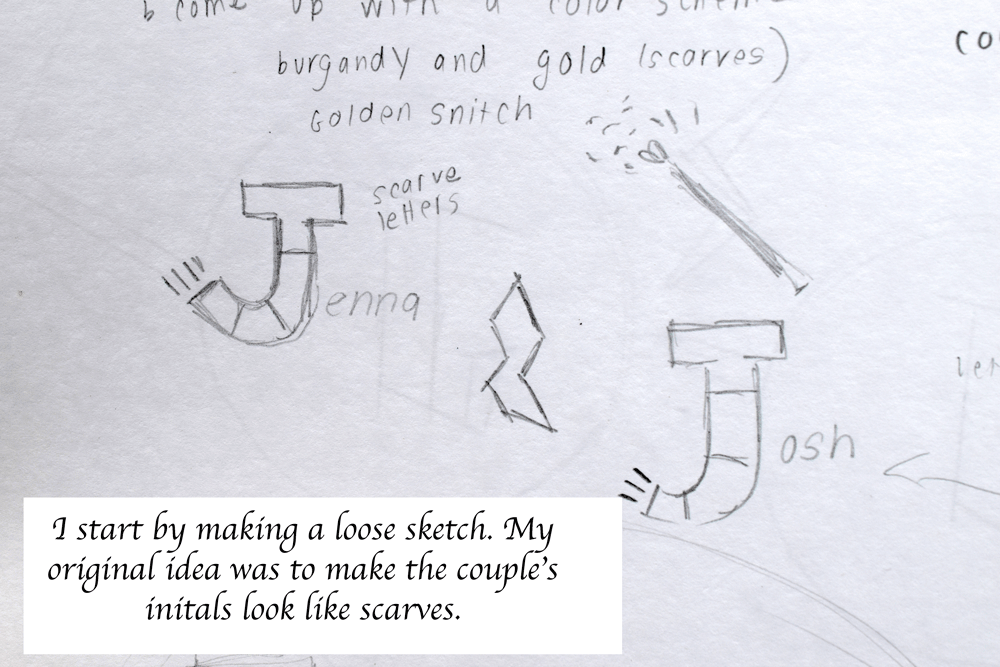
SKETCHING - Now that I have the list of things I want to include, I start sketching my ideas to see what fits. There is really no time frame. Some things come in a flash, while others take time to marinate and percolate. When I am feeling a little stuck, I walk away and take a break. What I notice is that sometimes ideas slip into my head when I have turned my attention elsewhere. Ideas seem to present themselves when they are ready to appear, regardless of my readiness to receive them.
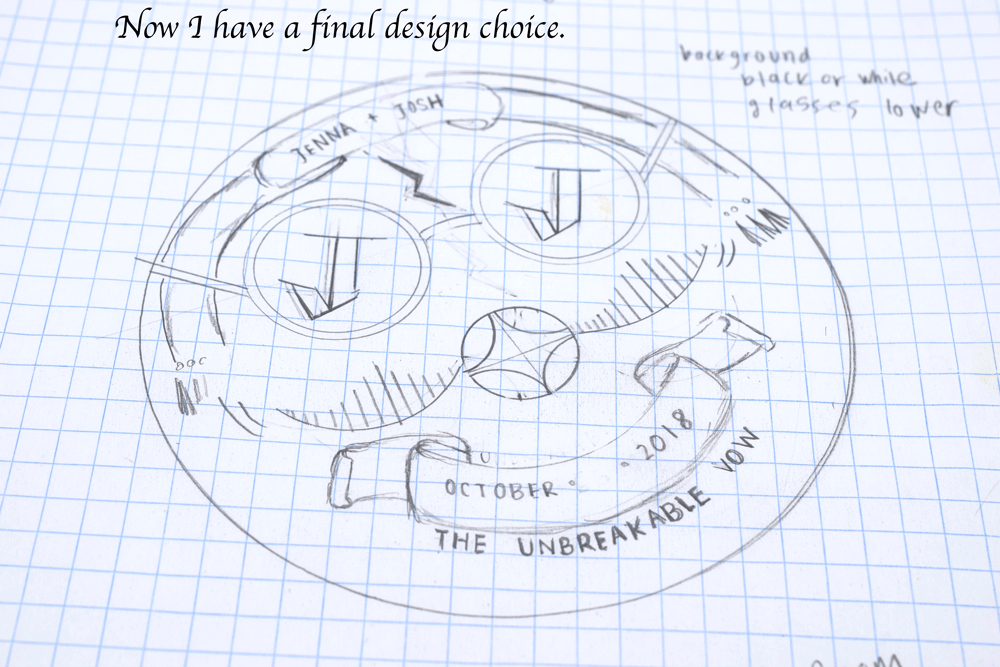
When I have a basic design, working on graph paper can really help perfect my spacing and text.
GET ANOTHER OPINION - Sometimes it’s really helpful to get an outsider opinion from someone who has nothing to do with the project. They can really give some excellent out-of-the box suggestions. I like to show things to my kids who often have fantastic ideas and critiques that I never would have thought of. Plus, they are BRUTALLY honest which I really do appreciate.
KEEP GOING UNTIL YOU CAN’T - It is hard to know when to stop when you are working for yourself. If you have a commission and a client wants more ideas, you just keep going until you land on something everyone is pleased with but when you are working on your own it is hard to make the edit choices and come to a stopping point. Each project has its own unique time frame and somehow I just know when I’m done. At this point, I like to take my finished sketch, place it on a light box and trace over it to create my final image.
Once I have my finalized sketch, I like to scan the image into my computer. Sometimes I will make changes in photoshop (such as sizing) and in this instance, I print the design from my computer right onto the fabric. I had to first make a final decision on the background fabric. I was considering unbleached muslin, black cotton, white cotton, or gray linen. I kept wanting a darker background so I narrowed it down to gray and black. In the end, I decided the gray would be pretty since black might be a little dark for a wedding plus the added bonus of being able to print the design directly onto my fabric.
Pictured below is the evolution of the sketches to get to the final product.
After making multiple edits and asking the opinion of my kid, I finally decided on this design. I ruled out the scarf as a bow because it seemed too ‘Cutesy”. I added a quote ‘The unbreakable vow’ from the book and added their names and date of the wedding. I still leave lots of room for flexibility and the design continues to evolve as I work. Once I have a final design choice, I scan it into the computer. Now I have to decide on a background fabric to print my design onto.
To print directly onto my fabric from my home computer, I cut a piece of fabric that is slightly bigger than a standard size piece of paper (8.5 x 11) so 9.5 x 12-ish.
I use a temporary spray fixative to adhere the fabric to a piece of card stock.
Above is the fixative I used.
Above is an example of card stock. You can but it by the sheet at the craft store or in packs like this. It is kind of a manilla folder type thickness just to give you an idea. It is thick enough to support your fabric but thin enough to still go through the printer.
Next, I use a rotary cutter to precisely trim the edges. If there are any little snags or fabric threads dangling, my printer rejects it.
Rotary cutters are a great tool to have if you work with fabric a lot.
If you want to see a more detailed version of how to print on fabric from your home printer you can see my blog post HERE.
I always like to add interfacing to the back of my fabric, especially if I am using light fabric. It makes the fabric less transparent and a little more stable.
Above is the kind of interfacing I like to use.
I start stitching. Now, about 1/3 to 1/2 the way through I often become filled with self doubt and regret about all my choices thus far. I start wondering about all the other ideas I scrapped and if I should just start all over again. For me, this is a big part of the process. Questioning leads me to ask myself what I don’t like about it and make corrections. I remind myself to keep pushing through the doubt. “If you don’t like it when you are finished, you can always start over” I say to myself OVER AND OVER AGAIN. It is all a part of the process. I make little changes as I go. I sewed right over the names on the scarves. I add some highlights to the letters to give them dimension. While I have a some of the the thread colors picked, I make a lot of stitch choices and color choices in the moment. I use a SATIN STITCH for the scarf, BACKSTITCH for the rest, and highlights using gold metallic thread. The design is constantly evolving.
I keep pushing past the dreadful doubt part, making little edits along the way to address my concerns.
To finish, I added a few more designs to balance out the negative space.
Instead of the names on the scarf I added a small heart charm. “Made With Love”, it says. And it is.
I sewed a small love potion charm to the right with the “Amortentia” lettering which is the love potion used in Harry Potter.
To the left I add a magic wand with the ‘lumos’ command, which means ‘light’ and a bead to represent the wand lighting up. I also add some gold metallic SEED STITCH to illustrate the light reflecting from the wand.
And…….Finished.
Hope you enjoyed taking the ride with me from sketch to finish.
Thanks for stopping by.
Warmly,
Pam


